Behind the scenes of Lights on Display, with projects, tips and relevant links.

Wednesday, April 21, 2010

Simple PVC Tepee Tree

If your yard is like mine and lacks Evergreen Trees, you can create some simple PVC trees to add to your display. The great thing is they're very simple to make and look fairly realistic in the display. The trees are also stackable, allowing them to be easily stored. Their shape makes them very stable in high wind situations, and they can be anchored with some bricks, rocks or cinder blocks.

My trees are 5' tall, but can be made smaller or a little bigger if desired. They are made out of 1/2" PVC pipe and fittings, heavy gauge wire, Hunter Green spray paint and artificial Pine garland.


Using an inexpensive pair of PVC cutters, I begin by cutting 8 - 5' 2" lengths of PVC for the uprights and 16 - 4" lengths for the base. These lengths can be adjusted if you wish to have a taller or shorter tree and a skinnier or fuller tree. After cutting the lengths, start dry fitting the PVC as shown in the photos, using 8 elbows, "Ts" and end caps of each. Gather the uprights, which will eventually be capped and wired together. 


Use a permanent marker and make a line across the fitting to the pipe, indicating the position of the "Ts." This will allow you to maintain the correct angle for gluing and then re-assembly. Start assembling the parts by cleaning and gluing the pipe and fittings. 


Cap the ends of the uprights and gather them together. Next, carefully drill a 1/4" hole through each one, just below the cap. Thread a heavy gauge wire through the holes and tie the ends together. Spray the finished assembly with Hunter Green spray paint and allow to dry. 


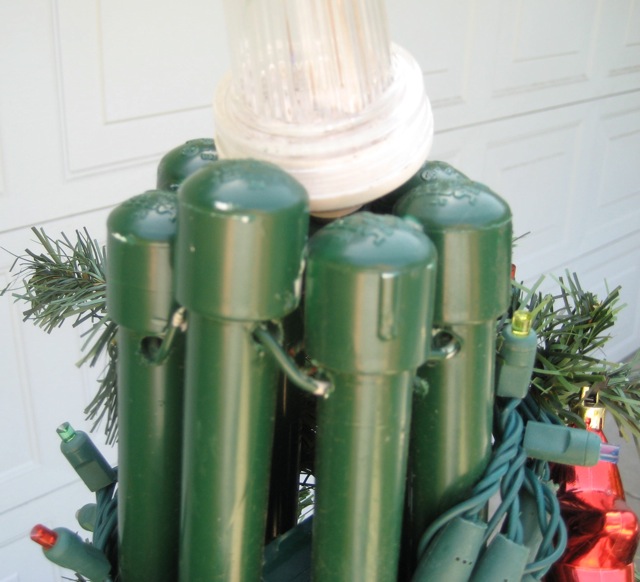
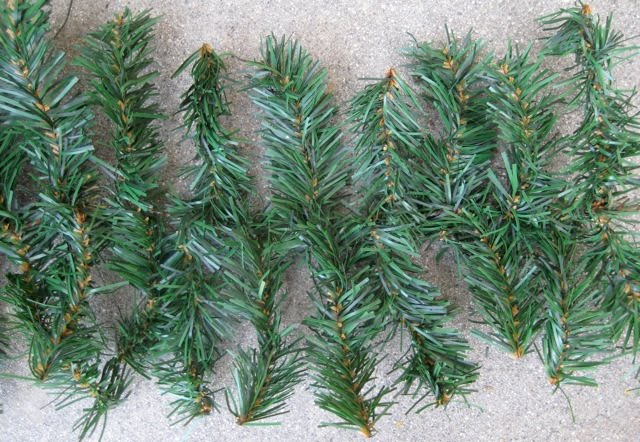
The entire tree is wrapped with an artificial Pine garland. It usually comes in 9' lengths and can be purchased from stores such as Michael's, for approx. $3 per strand. Before placing it on the tree, flare the branches out for the widest coverage. Start at the top and begin wrapping the garland around the tree. The branches can be used like "twisters" to intermittently secure the garland to the tree by twisting the branches around the pipe. 


Lights can be added by following the same path as the garland. The branches can be used as "twisters" to secure the lights. Branches can then be flared out to create the illusion of a real tree. The trees are naturally very stable, but rocks, bricks or cement blocks can be used to hold them more securely.

Thursday, March 25, 2010

Music Selection


Music is definitely the heart and soul of a Christmas display. Back in the old days, even before home based computer controlled lighting existed, I would create a selection of songs to play in the yard for my display. Back then, the music wasn't played from a CD, computer or mp3 controller, but a 12 minute looped cassette. The selection included a few Christmas classics, which helped set the holiday mood and brought the simple static display to life, giving it a soundtrack.


Nowadays, music is the driving force of the display. It sets the tone, tells a story and creates emotion. Each year around late Spring or early Summer, I choose the music for the upcoming holiday season. I search my large collection of Christmas songs, as well as comb through the iTunes music store, looking for something new and different. As I listen to the songs, I try to envision the lights, animatronics and video interpreting and supporting the words and music. My selection usually begins with some type of instrumental or lyrical overture, followed by a selection of up-tempo songs with lyrics. I always like to include a slow meaningful song that draws upon the spirit of the holidays, family and memories. It provides a soundtrack to some family photos or home movies from days gone by. To me, this is very important, and helps to bring some real emotion to the display, connecting the viewer to the warmth of their own Christmas memories. I close the display with an up-tempo grand finale and holiday sendoff. 


My shows run approximately 9-10 minutes. I find a full song to become very repetitive, especially for a synchronized light routine, so I edit them down to 1-1.5 minutes in length. This helps to move the show along, keeping the lighting and supporting elements fresh and unique. My goal is to seamlessly connect the songs together, creating a continuos show, which flows from song to song. I sometimes use instrumental elements such as cymbal crashes or swells to help blend the songs together or emphasize a moment.


A few years back, I introduced an animated character to my show by the name of "DJ Jingles." He appears on video as the show's emcee, spinning the hits and introducing characters such as "Frosty" and the "Holly Jolly Dancers." He's become the perfect character to greet the guests and keep the show rolling right along. 


When I program my songs, I listen for the beat, but I also pay close attention to the melody. It's very much like editing a music video. The video is often cut to the beat, while there may often be moments in which a shot is held for a period of time, allowing the viewer to register the action or content. There are also times when the music is slow, calling for dissolves between shots or dips to black, creating some emotion or drama. These video techniques are similar to the techniques used in the sequencing of the lights. The tinkling of piano keys can equal the twinkling of lights, or a guitar rift can translate the chasing of lights across the yard. Musical builds can also be conveyed by raising the intensity of the lights followed by a flash of strobes. Check out my collection of display videos to see how I translated some of my favorite Christmas tunes into a multi-media holiday show.


Tuesday, March 9, 2010

Transitioning to LED lighting


A few years ago I discovered that LED mini-lights, in my opinion, had finally surpassed the visual quality of incandescent mini-lights. The intense color and brilliance of the 5mm LEDs as shown above, are very impressive. They are full wave, which means they will fade on to off smoothly over the full range. Their energy efficiency also allows for more lights per controller, as well as the potential savings on the holiday electric bill.

I started my LED transition in 2008. My display contains five colors of lights; Red, Green, Yellow, Blue and Clear, so a full transition would be very costly. I decided to first change my Z-Tree over to LEDs. The beauty of these lights is that they blend well with the existing incandescents. They're much brighter and colorful, but they still have similar characteristics. Last year I converted over another 1/3 of my display, this time changing my mini trees, roof line, wreath and a few shrubs. This year I hope to finally complete the transition to LED.

Simple Snowflake roof stand


In 2007 I added a combination of sixteen large (31') and small (21") illuminated snowflakes to my rooftop, powered by one sixteen channel controller. They were a great addition, and also added some extra height to the display. 


The problem was, the roof has a very shallow pitch, which means the snowflakes could not be seen very well from the street when laid flat on the roof. The solution was to create simple wooden stands to elevate them. Two different size stands were needed to accommodate the large and small snowflake patterns. I was able to make them very easily and inexpensively with some 1 x 2s, drywall screws, cable ties and Black paint. 


First, you need to determine the pitch of the roof so the snowflakes will stand straight up. This is easily accomplished by laying a small scrap piece of 1 x 2 on edge on the roof running top to bottom. Place a level along the 1 x 2 and mark a level line on the board. Cut on the line and save this as a gauge for use in the construction of all your stands. 


Notice the dimensions on the attached photos. Both the large and small stand dimensions are included. Cut the stand pieces, and don't worry if they are exact, or if you need to shorten one a bit to accommodate your wood supply. The upright and it's brace contain the angle determined from the roof gauge mentioned earlier. Use the gauge block to mark the necessary angle for cutting. 


Layout the boards as seen in the photos. Drill some starter holes with an 1/8" drill bit, and then drive some short 3/4" drywall screws (locations marked with triangle and dashed lines) to attach the pieces together. Next, prime the stands with some outdoor rated wood primer, and then paint them with a Black outdoor latex paint. The large stand upright almost runs the full length of the snowflake for support, while the short upright stops short of the center opening on the small snowflake.


The snowflakes are easily attached to the stands using large cable ties. Place the snowflake against the stand, centering it over the upright. Be sure to allow enough space for the power card to exit at the bottom of the snowflake. For the small snowflakes, three cable ties, top, bottom and centered, should be enough to safely secure it to the stand. For the large, four cable ties spaced equally across the upright should be sufficient. Wrap the tie around the snowflake center's rope light, and around the 1 x 2 and snug up the tie, leaving the coupling along the back edge of the 1 x 2.

I found the simplest and cheapest solution for securing the stands at the landscaping department of my local Home Depot. I bought concrete scalloped curved edging to hold the stands. For extra safety, I also purchased some Black nylon twine to prevent the assemblies from sliding down the roof. I attached the twine to the stand and block, and the secured the other end to a secure structure on the roof, such as a vent pipe or chimney. I lay the curved landscape edging over the center rail, one for the small stand and two on opposite sides for the large.

Sunday, March 7, 2010

Shimmering Z-Star


I often get asked about the star which tops my Z-Tree. I created it using Silver Coroplast (CP) and a clear set of chasing or multi-function mini-lights (140 ct.). The three dimensional star measures 26" tip to tip, and it's supported by a threaded rod that is attached to the top most section of the tree.

The star is made from 4 individual cut pieces of CP. Two pieces are joined together with Duct tape. A duplicate assembly is created for the face and back of the star. These two assemblies will later be joined with small clear cable ties. First download the pattern pdf and print it out.  Cut out the large and small star point patterns. Using the Layout Pattern guide, build the layout pattern 1 and 2 on the Coroplast by tracing the cutouts multiple times with a marker. As you trace the pattern, mark the bulb holes with a small nail or pin. Remember to only do this for the star face only. Cut out each layout pattern from the Coroplast.

Next, 140 holes need to be made in the face half of layout pattern 1 and 2. Use a 3/8" masonry bit, and drill through the Coroplast into a scrap piece of wood at the points marked on the pattern. A mini-light bulb should fit snugly into the hole.

To eventually join the front and back star halves, you will need to poke small holes along the edge on the face and back at the marked pattern locations on the full assembly guide. Stack both the front and back layout pattern 1 in one group and front and back layout pattern 2 in another group. Using a small hole punch, punch through both pieces at once. The hole should be big enough to eventually thread a small clear cable tie through to join both halves together.

On the full assembly guide, notice the cut lines and the score lines. When cutting and scoring, use a straight edge and a sharp utility knife to carefully make the cuts. Tape the sections as indicated on the pattern at the proper locations with duct tape, and begin folding the CP to bring the edges together. At this point, the three dimensional aspect of the star will begin to form and the star face and back will no longer sit flat. A center hole can now be drilled in the front half.


Randomly insert the lights through the CP. Small pieces of tape on the back side can be used to keep the lights in place. Test the lights and adjust the speed control to the desired shimmering effect.
A 12" length of 3/4" strap iron is used to mount the star to the tree. Drill three 3/8" holes, two - 1" in from the ends and one centered on the strap iron. Bend the bar into the shape as seen in the picture. Begin with a big "U" shape, and then flare out the ends to meet the star's large side tips. Mark the  locations of the end holes onto the Coroplast, which should be the back of the star, and drill it with the 3/8" masonry bit. Next, attach the threaded rod to the center hole of the strap iron with two nuts and two lock washers. Be sure to tighten the nuts as much as possible to prevent the assembly from loosening up and twisting. Mount the strap iron to the back of the star with two 3/8"x 1/2" pan head machine screws. Use washers against the screw heads to prevent it from ripping through the Coroplast. The bar should be centered on the bottom tip and in the same position as the picture to the right.


Now it's time to join the front and back together. Line up the sections and carefully tuck the wires inside. Start threading the cable ties through the front and back holes and snug them tightly. After all the cable ties have been placed, clip the cable tie tails as short as possible.

This completes the assembly. As most trees differ, you will need to mount the star to the top of your tree using your own method of attachment.

Sunday, February 28, 2010

Chasing Candy Canes


One of the elements of my display is a line of chasing candy canes bordering the front of my display. The canes are individually illuminated and controlled by one sixteen channel controller.

The 30" canes can be purchased at a home center, but they are not the illuminated canes that are often found as a group of three. The canes I use are solid White PVC and need to be modified. The results are much better and result in an even illuminated candy cane.


To create the chasing canes, I first start by cutting a half inch clear rope light into a three foot length, which is two rope light cut segments. I cap off the cut end of the rope light and add the power cord to the other end. 


Then, I carefully drill a half inch hole 2" up from the bottom of the candy cane. I choose the direction of the cane I want to face towards the audience, and drill the opposite side. Returning to the rope light, I cut off the plug, leaving 8" of wire attached to the rope light. Then I feed the rope light through the bottom opening of the cane. This may take some gentle twisting and wiggling to get the rope light through. I stop as soon as the end of the power cord reaches the drilled hole.  A small pair of long nosed plier can be used to pull the wire through the hole. Pull the wire and the rope light until the capped end of the rope light stops right at the top end of the cane. The same plug can be reattached by carefully wrapping it with electrical tape to protect it from the elements. A better and quicker alternative is vampire plugs that can quickly be attached to the cut ends.


Half inch sections of PVC pipe can be used to stake the canes into the ground. The pipe should easily slide into the base of the cane, but may need a small piece of Duct Tape wrapped around the top of the pipe to create some friction. Cutting the bottom of the PVC into a spike will help to drive the pipe into the ground. Small PVC hand cutters are perfect for this job. When placing the canes, you can either gently drive the PVC pipe into the ground with a hammer, or use a large screwdriver or rod to open up a hole in the ground. The canes can then be slid over the pipe and into place. Be careful not to force the cane down onto the pipe too far, which could severe the power cord.

An electrical harness of wires needs to be created, which will feed power to each cane from its corresponding plug on the controller. The easiest way to make this is with individual runs of lamp cord cut to the proper lengths and plugged on both ends. A more economical, but more time consuming and less bulky method is to create the harness using one common wire and sixteen hots. This takes some electrical know-how and will not be covered in this how-to.

Monday, February 15, 2010

Introduction


Christmas has always been a special time of the year for my family. I can still remember the glow outside the living room window as I ran to the tree to open my gifts on Christmas morning. The house was always magically decorated inside and out. My mom took care of the inside decorations, while my dad filled the yard with handmade items, fashioned from wood and whatever else he could find. He created motorized displays of the Little Drummer Boy, drumming away at the manger, Santa playing a pipe organ and a workshop fully staffed by Santa and his elves.

His displays were always a must see for the small town of Saint John Indiana. As I grew up, I knew I had to continue the tradition, and by my freshman year of high school, I took the decorating over.
Occasionally my father would lend a hand, but mostly I was on my own. The display continued to grow as I added more and more lights and decorations of my own creation. I began to build my own animated figures when I realized I couldn't afford what I saw in the malls or the department store windows of Chicago. So each evening after school and on weekends, I would make my own animated figures fashioned from plywood, chicken wire, fabric and vending machine motors. I kept adding to the display for years until my job took most of my free time. I can still remember the rush to get the display up and running over the Thanksgiving holiday in the cold Indiana weather.

Years later, I moved to Los Angeles, where I’m currently residing in the small community of Sherman Oaks. The house and yard are much smaller, and the animated figures I created have been left behind with relatives in Indiana. Decorating in a parka and gloves have been replaced with shorts and a t-shirt. The older I get, the more I appreciate this as I decorate in the warm Novembers of California, but I still miss the snow.

Computer control was added to my display in 2003. It gave me the ability to animate lights to music, and was a welcome addition to my display. As I fired up the PC, a long time dream of computer controlled lighting was realized. Weeks of programming had paid off, as my lights changed to the beat of the music. In my line of work, computers and technology are commonplace, but that evening was truly magical and I wished my dad could have seen the display.

Currently I work as video editor, creating theatrical and television commercials and presentations. The works of my creativity are displayed on a flat screen, and each Christmas, the display allows me to break out of the tube and put on a show in the three dimensional world. In my off hours, I’ve been able to turn my love of decorating and video career into a side business venture. A friend and I developed a Halloween product called "Big Scream TV," a series of entertainment videos that can be used to decorate and entertain trick-or-treaters and Halloween party guests. Halloween 2004 was its national distribution premiere as it became a unique addition to the Halloween decorating market and a big hit with consumers. Recently we released "Santa's Symphonies," a DVD that was inspired by one of my past displays. One of the music videos was used last year to open my show.

As a result of the attention my display received on the net in 2005, the Cincinnati Zoo and Botanical Garden hired me to bring my show to them for the 2006 holiday season. I was back in the Midwest where it all began, doing the thing I loved to do, and getting paid for it. The show was well received and a hit at the zoo. This was one of the many things that filled my busy 2006 holiday schedule. I returned home to get my personal display ready to be featured on The History Channel's Modern Marvels “Christmas Tech” show. It was an exciting end to a great year!

In the following years, I added a bit more technology and "show" to my display. I wanted to break away from just lights, and create a show to entertain the visitors. In 2006 I introduced synchronized video projection to the display, followed in 2007 with a character named "DJ Jingles," the emcee of the show. The next year, a crooning animatronic snowman was created to bring an almost live performance to the show. This past year, the show became more complete with a pair of tap dancing animatronic elves tapping out the tunes. Each year's additions have been a big hit with the guests, and it's really fun to watch the young and old alike, dancing and singing along with the elves. Each year I start from scratch, introducing a new collection of songs, edited into a 9-10 minute show and programmed to a new sequence of lights. A new video is created, and the animatronics are programmed to once again sing and dance along with the music.

So why do I have this crazy obsession with decorating and Christmas? Each year as I stand in the front yard and watch the display, a flood of wonderful childhood memories of Christmases past resurface. My parents always made the holidays so special and I love to be able to share a little bit of the magic they instilled in me. I guess traditions like these and the memories they rekindle are one of most special things we have, and one of the greatest joys of Christmas.

 - Mike Ziemkowski

Followers